はじまり
今回は、この記事で作成した概要図を作る際に使ったMermaidに関する記事になります。

その概要図を作るのは苦労したもんねえ。

レイアウトとかアイコンを入れたりとか色々ありましたね。
なので、Mermaidをどう書くとどういうレイアウトになるのかどうかを今回の記事では観察してみたいと思います。

かんさつかんさつぅ〜。目を皿にしてみました。
元のソース
今回試すソースは、こちらになります。その下に実際に描画されるものも貼っています。
graph LR;
subgraph Overview[Overview];
subgraph Landmaster135;
A[fab:fa-github GitHub Actions ]
B(README.md)
end
subgraph dev environment;
I[fa:fa-laptop MacBook  ]
J[fab:fa-docker Docker  ]
end
subgraph Firebase;
K[<img src='https://simpleicons.org/icons/firebase.svg' width='20' /><br>Firebase-tools]
L(<img src='https://simpleicons.org/icons/googlecloud.svg' width='20' /><br>cloud functions)
end
subgraph target sites;
D(<img src='https://simpleicons.org/icons/zenn.svg' width='20' /><br>Zenn)
E(<img src='https://simpleicons.org/icons/qiita.svg' width='20' /><br>Qiita)
F(<img src='https://simpleicons.org/icons/wordpress.svg' width='20' /><br>WordPress)
M(far:fa-sticky-note<br>note)
end
subgraph feed-fetcher: app;
C[fab:fa-node feed-fetch  ]
end
A -->|Step2. Update| B
A -->|Step1. Install app: GET| C
C -->|Step1. Install app: Response| A
C -->|GET| D
D -->|Response <br>with feed|C
C -->|GET| E
E -->|Response <br>with feed|C
C -->|GET| F
F -->|Response <br>with feed|C
C -->|GET| L
L -->|Response <br>with feed|C
L -->|GET| M
M -->|Response <br>with feed|L
C -->|clone| I
I -->|build &<br> copy source| J
J -->|test source| I
I -->|Request<br>to deploy|K
I -->|push| C
K -->|deploy<br>functions| L
style D fill:#ffffff,color:#000000,stroke:#000000,stroke-width:2
style E fill:#ffffff,color:#000000,stroke:#000000,stroke-width:2
style F fill:#ffffff,color:#000000,stroke:#000000,stroke-width:2
style K fill:#ffffff,color:#000000,stroke:#000000,stroke-width:2
style L fill:#ffffff,color:#000000,stroke:#000000,stroke-width:2
style M fill:#ffffff,color:#000000,stroke:#000000,stroke-width:2
linkStyle 0 stroke:#ee3,stroke-width:4px
linkStyle 1 stroke:#ee3,stroke-width:4px
linkStyle 2 stroke:#ee3,stroke-width:4px
end
style Overview fill:#3c4451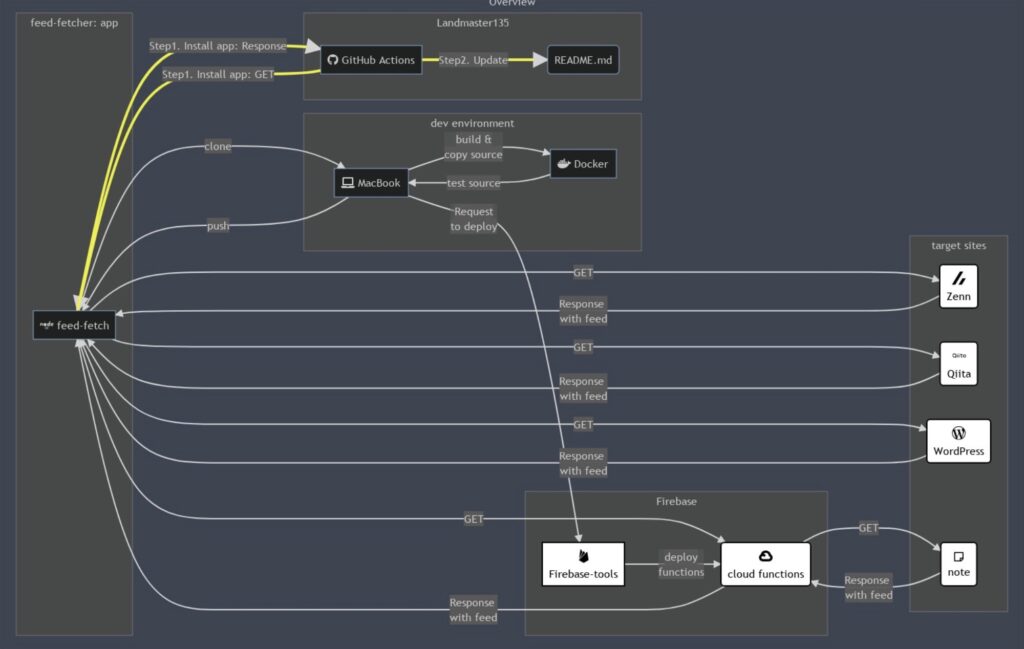
試験①
このソースは、元のソースからdev environmentとLandmaster135を入れ替えました。この場合は、入れ替えた2つが上下で入れ替わりました。
graph LR;
subgraph Overview[Overview];
subgraph dev environment;
I[fa:fa-laptop MacBook  ]
J[fab:fa-docker Docker  ]
end
# ↑↓dev environmentとLandmaster135を入れ替えた。
subgraph Landmaster135;
A[fab:fa-github GitHub Actions ]
B(README.md)
end
subgraph Firebase;
K[<img src='https://simpleicons.org/icons/firebase.svg' width='20' /><br>Firebase-tools]
L(<img src='https://simpleicons.org/icons/googlecloud.svg' width='20' /><br>cloud functions)
end
subgraph target sites;
D(<img src='https://simpleicons.org/icons/zenn.svg' width='20' /><br>Zenn)
E(<img src='https://simpleicons.org/icons/qiita.svg' width='20' /><br>Qiita)
F(<img src='https://simpleicons.org/icons/wordpress.svg' width='20' /><br>WordPress)
M(far:fa-sticky-note<br>note)
end
subgraph feed-fetcher: app;
C[fab:fa-node feed-fetch  ]
end
# 略...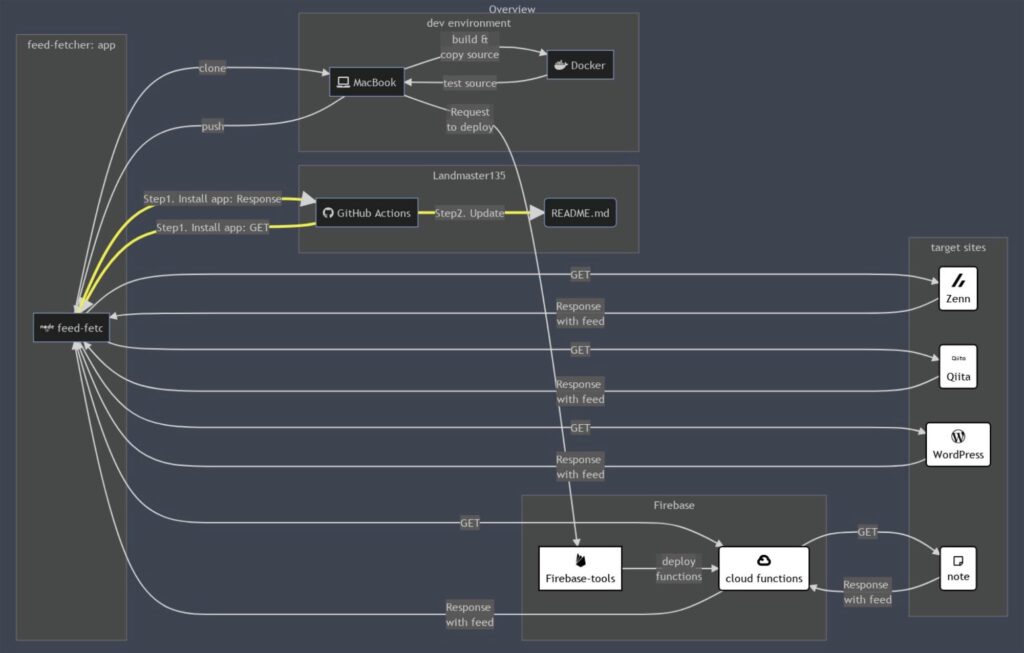
試験②
このソースは、元のソースからfeed-fetcher: appとtarget sitesを入れ替えました。この場合は、target sitesが下に移動しました。
graph LR;
subgraph Overview[Overview];
subgraph Landmaster135;
A[fab:fa-github GitHub Actions ]
B(README.md)
end
subgraph dev environment;
I[fa:fa-laptop MacBook  ]
J[fab:fa-docker Docker  ]
end
subgraph Firebase;
K[<img src='https://simpleicons.org/icons/firebase.svg' width='20' /><br>Firebase-tools]
L(<img src='https://simpleicons.org/icons/googlecloud.svg' width='20' /><br>cloud functions)
end
subgraph feed-fetcher: app;
C[fab:fa-node feed-fetch  ]
end
# ↑↓feed-fetcher: appとtarget sitesを入れ替えた。
subgraph target sites;
D(<img src='https://simpleicons.org/icons/zenn.svg' width='20' /><br>Zenn)
E(<img src='https://simpleicons.org/icons/qiita.svg' width='20' /><br>Qiita)
F(<img src='https://simpleicons.org/icons/wordpress.svg' width='20' /><br>WordPress)
M(far:fa-sticky-note<br>note)
end
# 略...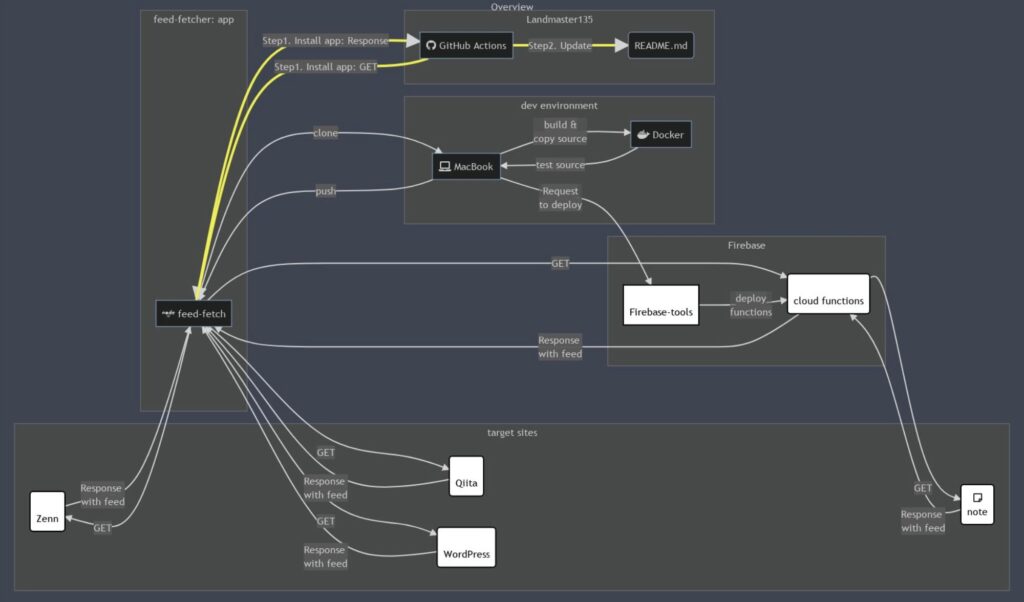
試験③
このソースは、元のソースからFirebaseとtarget sitesを入れ替えました。表示に変化はありません。
graph LR;
subgraph Overview[Overview];
subgraph Landmaster135;
A[fab:fa-github GitHub Actions ]
B(README.md)
end
subgraph dev environment;
I[fa:fa-laptop MacBook  ]
J[fab:fa-docker Docker  ]
end
subgraph target sites;
D(<img src='https://simpleicons.org/icons/zenn.svg' width='20' /><br>Zenn)
E(<img src='https://simpleicons.org/icons/qiita.svg' width='20' /><br>Qiita)
F(<img src='https://simpleicons.org/icons/wordpress.svg' width='20' /><br>WordPress)
M(far:fa-sticky-note<br>note)
end
# ↑↓ Firebaseとtarget sitesを入れ替えた。
subgraph Firebase;
K[<img src='https://simpleicons.org/icons/firebase.svg' width='20' /><br>Firebase-tools]
L(<img src='https://simpleicons.org/icons/googlecloud.svg' width='20' /><br>cloud functions)
end
subgraph feed-fetcher: app;
C[fab:fa-node feed-fetch  ]
end
# 略...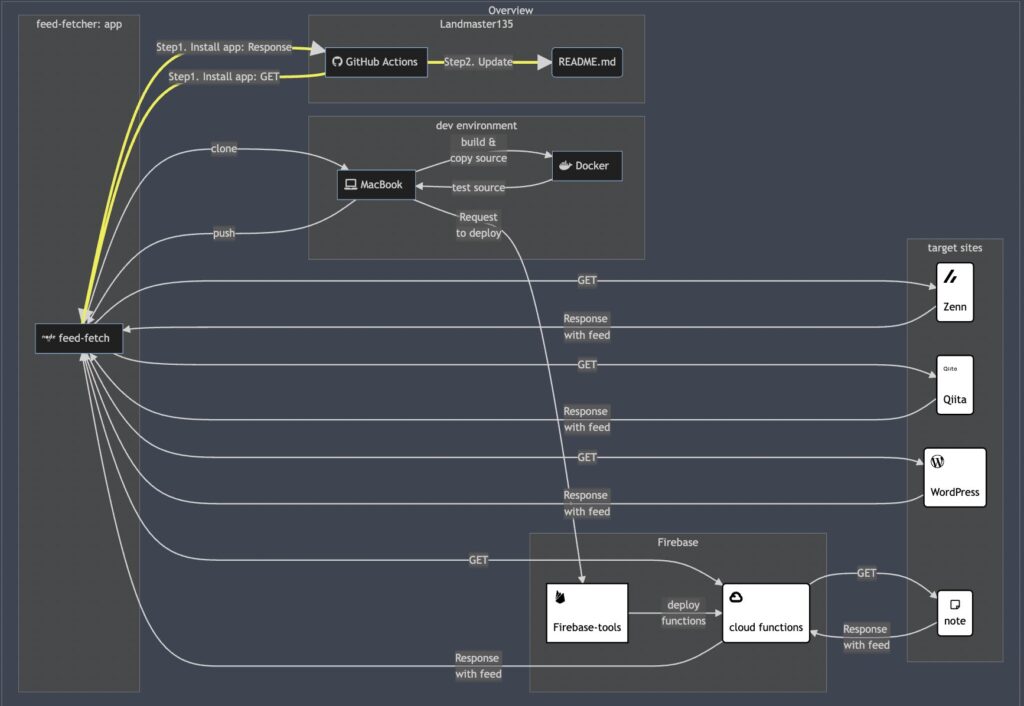
試験④
このソースは、元のソースからtarget sitesを一番上に持ってきました。これも描画内容は変わりません。
graph LR;
subgraph Overview[Overview];
subgraph target sites;
D(<img src='https://simpleicons.org/icons/zenn.svg' width='20' /><br>Zenn)
E(<img src='https://simpleicons.org/icons/qiita.svg' width='20' /><br>Qiita)
F(<img src='https://simpleicons.org/icons/wordpress.svg' width='20' /><br>WordPress)
M(far:fa-sticky-note<br>note)
end
subgraph Landmaster135;
A[fab:fa-github GitHub Actions ]
B(README.md)
end
subgraph dev environment;
I[fa:fa-laptop MacBook  ]
J[fab:fa-docker Docker  ]
end
subgraph Firebase;
K[<img src='https://simpleicons.org/icons/firebase.svg' width='20' /><br>Firebase-tools]
L(<img src='https://simpleicons.org/icons/googlecloud.svg' width='20' /><br>cloud functions)
end
subgraph feed-fetcher: app;
C[fab:fa-node feed-fetch  ]
end
# 略...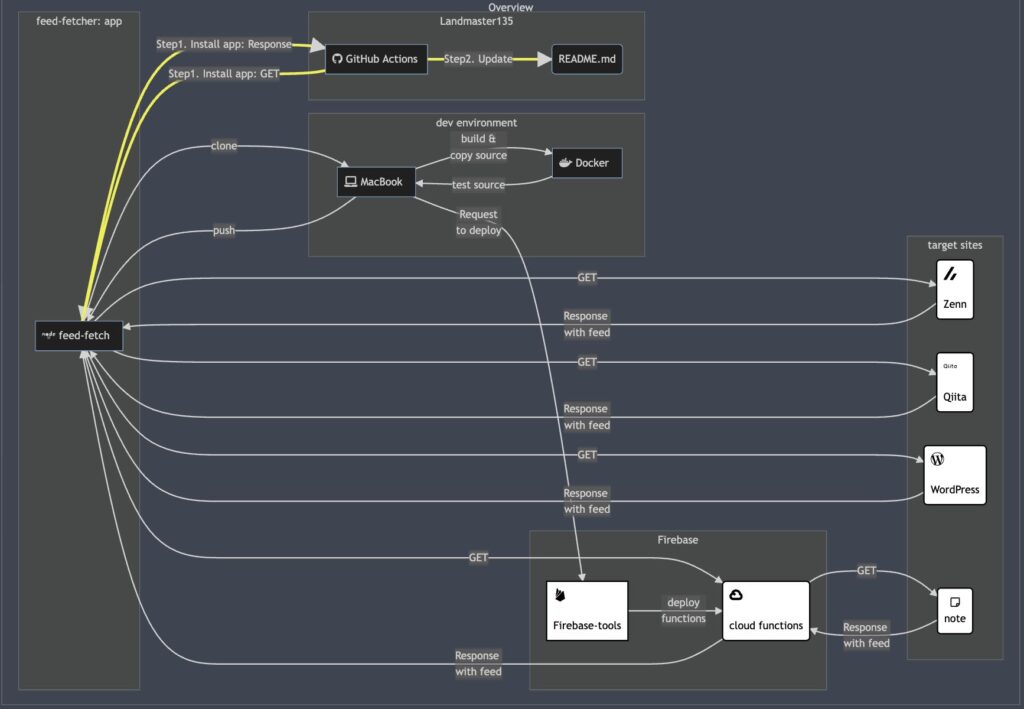
試験⑤
このソースは、元のソースからコーディングするsubgraphを逆順にしたものです。Landmaster135が最下段に移動しています。
graph LR;
subgraph Overview[Overview];
subgraph feed-fetcher: app;
C[fab:fa-node feed-fetch  ]
end
subgraph target sites;
D(<img src='https://simpleicons.org/icons/zenn.svg' width='20' /><br>Zenn)
E(<img src='https://simpleicons.org/icons/qiita.svg' width='20' /><br>Qiita)
F(<img src='https://simpleicons.org/icons/wordpress.svg' width='20' /><br>WordPress)
M(far:fa-sticky-note<br>note)
end
subgraph Firebase;
K[<img src='https://simpleicons.org/icons/firebase.svg' width='20' /><br>Firebase-tools]
L(<img src='https://simpleicons.org/icons/googlecloud.svg' width='20' /><br>cloud functions)
end
subgraph dev environment;
I[fa:fa-laptop MacBook  ]
J[fab:fa-docker Docker  ]
end
subgraph Landmaster135;
A[fab:fa-github GitHub Actions ]
B(README.md)
end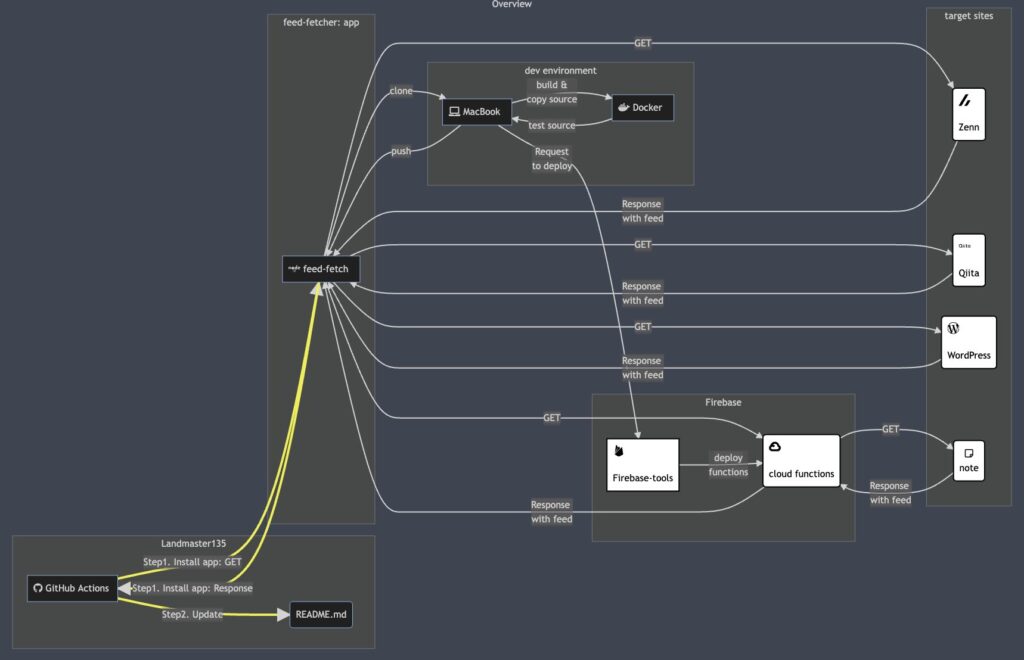
おさらい(描画ロジックの予測)
ここまで観察してみて、graph LR;を描画する際の描画ロジックが以下のようになっていると予測しています。
- 上に書かれている
subgraphは、下に書かれているsubgraphの上に描画される。→ コード順のロジック subgraphA、subgraphB、subgraphCとsubgraphDがある場合、BがAより下でも、それらの上に描画されているDとCについて、DがCより下であり、BがCのみ結合し、AがCとDに結合している場合、BはAよりも上に描画される。→ 結合してるgraphのコード順ロジック
結合してるgraphのコード順ロジックは、図示するとこんな感じです。
graph LR;
subgraph Overview[Overview];
subgraph C;
C1[<img src='https://simpleicons.org/icons/firebase.svg' width='20' /><br>Firebase-tools]
C2(<img src='https://simpleicons.org/icons/googlecloud.svg' width='20' /><br>cloud functions)
end
subgraph D;
D1[fa:fa-laptop MacBook  ]
end
subgraph A;
A1[fab:fa-node feed-fetch  ]
A2[fab:fa-node feed-fetch  ]
end
subgraph B;
B1(<img src='https://simpleicons.org/icons/zenn.svg' width='20' /><br>Zenn)
end
A1 --> C1
B1 --> C1
A1 --> D1
end
# 略...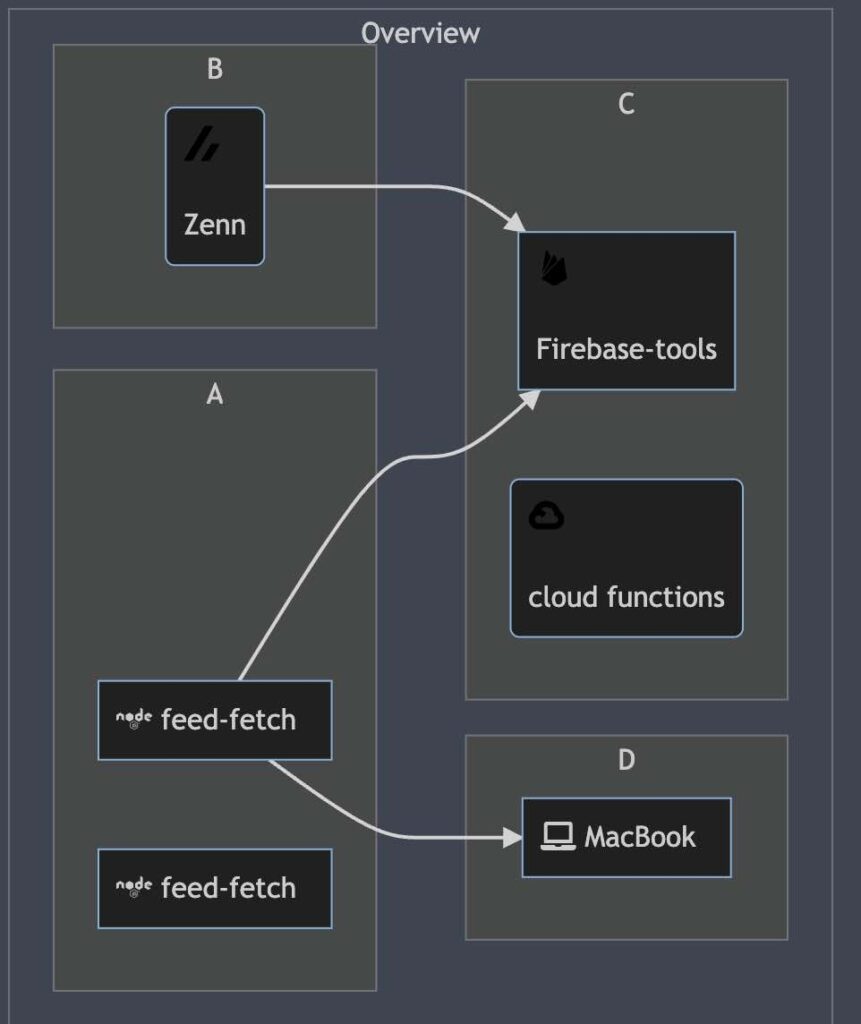
しかし、以下のように書き換えると、描画が結合してるgraphのコード順ロジック」と違います。どうやら、結合する子要素の順番もロジックに入るようです。→ 子要素のコード順のロジック
graph LR;
subgraph Overview[Overview];
subgraph C;
C1[<img src='https://simpleicons.org/icons/firebase.svg' width='20' /><br>Firebase-tools]
C2(<img src='https://simpleicons.org/icons/googlecloud.svg' width='20' /><br>cloud functions)
end
subgraph D;
D1[fa:fa-laptop MacBook  ]
end
subgraph A;
A1[fab:fa-node feed-fetch  ]
A2[fab:fa-node feed-fetch  ]
end
subgraph B;
B1(<img src='https://simpleicons.org/icons/zenn.svg' width='20' /><br>Zenn)
end
A1 --> C1
B1 --> C2 // ここをC1→C2に書き換えた。
A1 --> D1
end
# 略...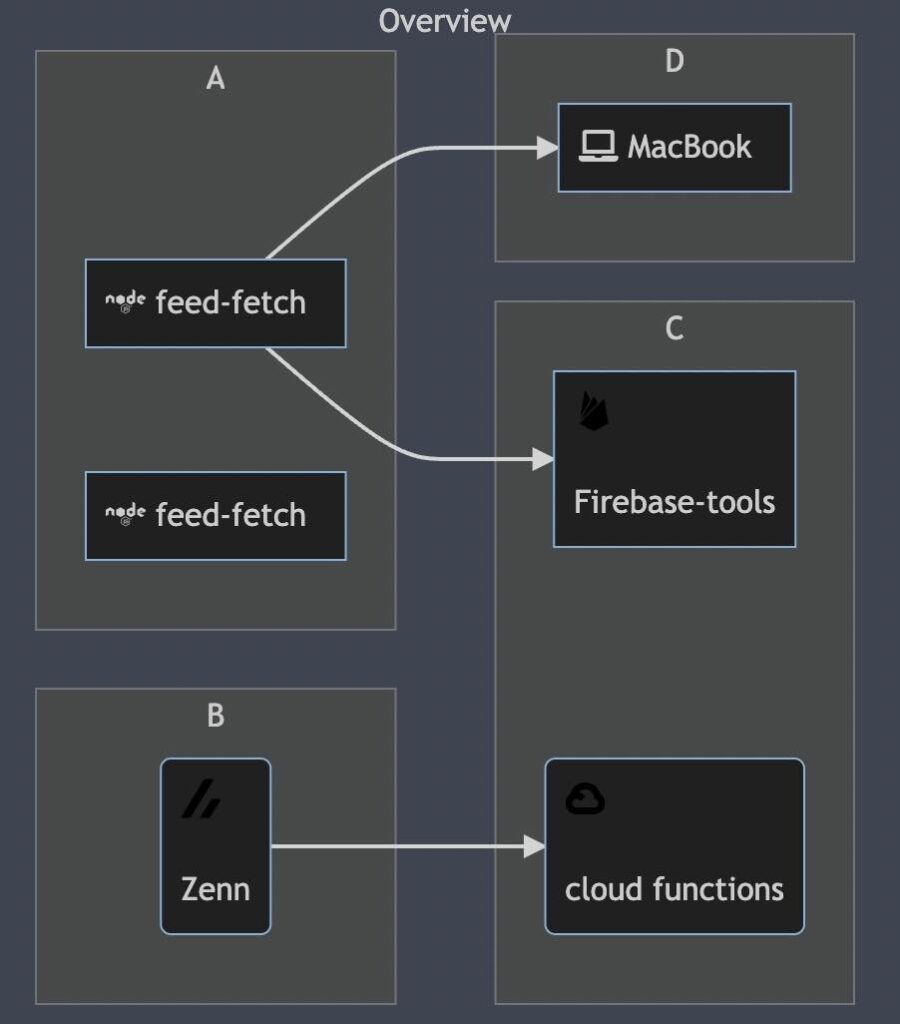
おしまい

ある程度、挙動は掴めたかな?

まあ、graph LR;の挙動は大体。Mermaidもイイ感じに動くから、ある程度ちゃんと設計されていたら、整理されたレイアウトになりそうだね。

そうね。これからも使ってみて、汎用的に使えるかどうか試してみるけど、自分の設計が整理されていないとその概要図もそりゃあ汚くなってしまうよね。

使う人次第ですなあ。しみじみ。
以上になります!


コメント